How to pixelate your sprites automatically.
Page 1 of 1
 How to pixelate your sprites automatically.
English
Twenty years ago, programs that aided authors in creating characters were not very resourceful and practically everything was done by hand primarily a character in pixels. Redesigning each sprite for hours on end based on the main palette was a real challenge.
However, these days I decided to get off the autopilot and test the various advanced features for the palette in the fighter factory. From this, it comprises a mechanism that in a few hours leaves your character in pixels quickly, so you can create different palettes.
With this method, multiple creators will save hours working in pixels. Since I do not see much tutorials out there, so let's go to the lesson.
First, open the character in the fighter factory. (Prefer version 3.0 of 2012)
Yes, each version of fighter factory has different features. Remember that the programmers of the versions are not the same. Another time, I speak of interesting versions to own.
With the character open, note which is the first color slot, as this is the main palette. If the palette does not exist, save it, because we will need the existence of it. Leave the sff in universal format and in the def file do not forget to declare the palette. Otherwise, instead of the image going to the first slot it will create another.
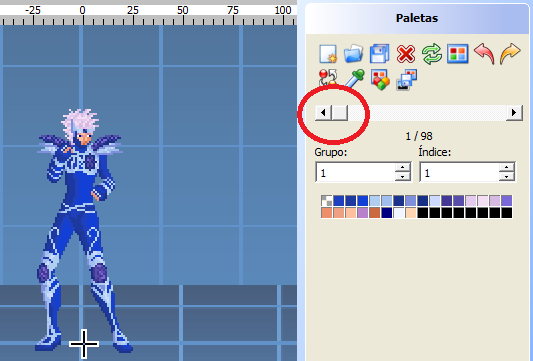
Let's go to a sprite of the character that has no association with the main palette.
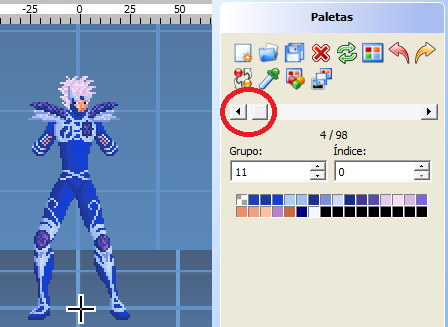
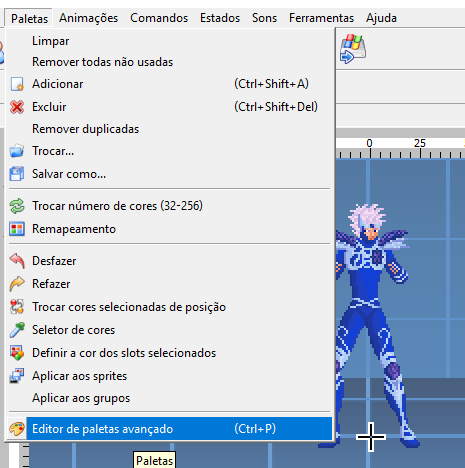
Now go to the palettes tab and then select Advanced Palette Editor.
The following frame will be shown to the user.
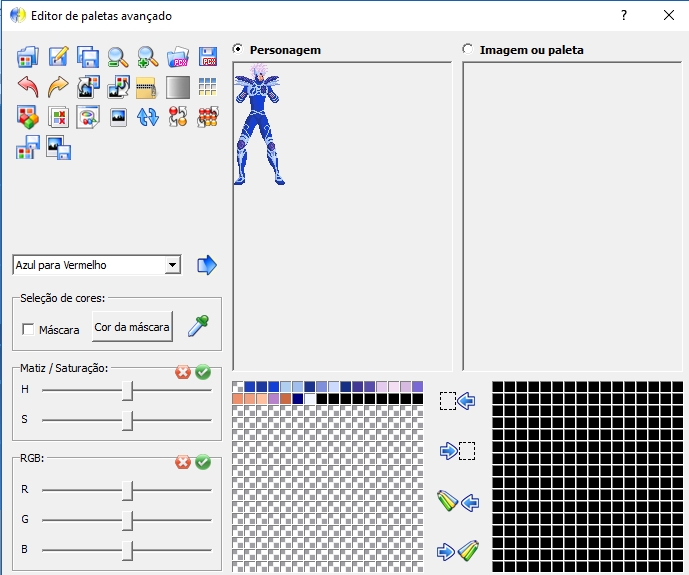
Apply the main palette to the unlinked sprite. Logically after the process you will observe the character with strange colors.
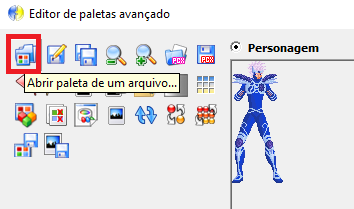
Note that after applying the palette the colors of the sprite become messed up. Depending on the character the situation can get worse.
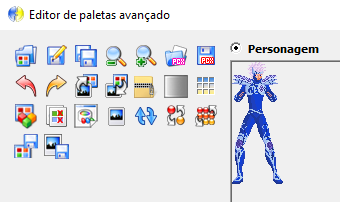
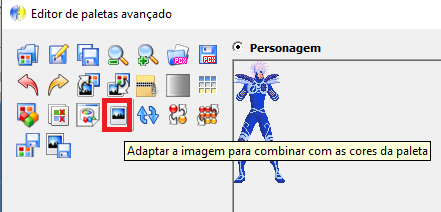
Now, let's go to the resource that will save you time. Click the Adapt the Image icon to match the palette colors. Notice that the blots are gone.
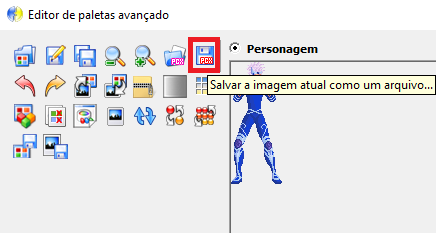
The safest method is to save the image as a file and close the advanced palette editor. Sometimes you have some problems modifying the image automatically.
Now load the new image onto the sprite.

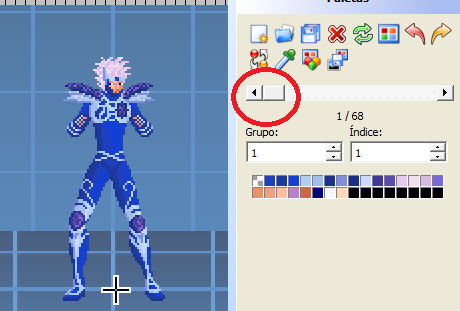
Ready! Save the sff and repeat the process on all the sprites that are needed.
After pixelating all the sprites you simply create the palettes of your liking.
That's all for now. As soon as I have another interesting lesson, I'll see you again.
Greetings.
;---------------------
Portuguese
Há vinte anos, os programas que auxiliavam os autores na criação de personagens não tinham muitos recursos e praticamente tudo era feito a mão principalmente um personagem em pixels. Redesenhar cada sprite por horas a fio baseadas na paleta principal era um verdadeiro desafio.
Porém, nestes dias resolvi sair do piloto automático e testar os diversos recursos avançados para paleta no fighter factory. A partir disso, compreende um mecanismo que em algumas horas deixa seu personagem em pixels rapidamente, podendo assim criar diferentes paletas.
Com esse método, vários criadores vão economizar horas ao trabalhar em pixels. Como não vejo muito tutoriais disso por aí, então vamos à lição.
Primeiramente, abra o personagem no fighter factory. (Prefira a versão 3.0 de 2012)
Sim, cada versão do fighter factory possui recursos diferentes. Lembre que os programadores ao longo das versões não são os mesmos. Outra hora, falo de versões interessantes para se possuir.
Com o personagem aberto, observe qual é o primeiro slot de cores, pois esse é a paleta principal. Caso a paleta não exista, salve-a, pois vamos precisar da existência dela. Deixe o sff no formato universal e no arquivo def não se esqueça de declarar a paleta. Caso contrário, em vez da imagem ir para o primeiro slot ela vai criar outro.

Vamos para um sprite do personagem que não tenha associação com a paleta principal.

Agora vá à guia paletas e em seguida selecione editor de paletas avançado.

O seguinte quadro será mostrado ao usuário.

Aplique a paleta principal no sprite não vinculado. Logicamente após o processo você observará o personagem com cores estranhas.

Observe que após a aplicação da paleta as cores do sprite ficam desarrumadas. Dependendo do personagem a situação pode ficar pior.

Agora, vamos ao recurso que vai lhe poupar tempo. Clique no ícone adaptar a imagem para combinar com as cores da paleta. Observe que os borrões sumiram.

O método mais seguro é salvar a imagem como um arquivo e fechar a editor de paleta avançada. Às vezes da alguns problemas ao modificar a imagem automaticamente.

Agora carregue a nova imagem sobre o sprite.


Pronto! Salve o sff e repita o processo em todos os sprites que forem necessários.
Depois de pixelar todos os sprites basta você criar as paletas de seu gosto.
Isso é tudo por hora. Assim que tiver outra lição interessante, vejo vocês outra vez.
Saudações.
Twenty years ago, programs that aided authors in creating characters were not very resourceful and practically everything was done by hand primarily a character in pixels. Redesigning each sprite for hours on end based on the main palette was a real challenge.
However, these days I decided to get off the autopilot and test the various advanced features for the palette in the fighter factory. From this, it comprises a mechanism that in a few hours leaves your character in pixels quickly, so you can create different palettes.
With this method, multiple creators will save hours working in pixels. Since I do not see much tutorials out there, so let's go to the lesson.
First, open the character in the fighter factory. (Prefer version 3.0 of 2012)
Yes, each version of fighter factory has different features. Remember that the programmers of the versions are not the same. Another time, I speak of interesting versions to own.
With the character open, note which is the first color slot, as this is the main palette. If the palette does not exist, save it, because we will need the existence of it. Leave the sff in universal format and in the def file do not forget to declare the palette. Otherwise, instead of the image going to the first slot it will create another.

Let's go to a sprite of the character that has no association with the main palette.

Now go to the palettes tab and then select Advanced Palette Editor.

The following frame will be shown to the user.

Apply the main palette to the unlinked sprite. Logically after the process you will observe the character with strange colors.

Note that after applying the palette the colors of the sprite become messed up. Depending on the character the situation can get worse.

Now, let's go to the resource that will save you time. Click the Adapt the Image icon to match the palette colors. Notice that the blots are gone.

The safest method is to save the image as a file and close the advanced palette editor. Sometimes you have some problems modifying the image automatically.

Now load the new image onto the sprite.


Ready! Save the sff and repeat the process on all the sprites that are needed.
After pixelating all the sprites you simply create the palettes of your liking.
That's all for now. As soon as I have another interesting lesson, I'll see you again.
Greetings.
;---------------------
Portuguese
Há vinte anos, os programas que auxiliavam os autores na criação de personagens não tinham muitos recursos e praticamente tudo era feito a mão principalmente um personagem em pixels. Redesenhar cada sprite por horas a fio baseadas na paleta principal era um verdadeiro desafio.
Porém, nestes dias resolvi sair do piloto automático e testar os diversos recursos avançados para paleta no fighter factory. A partir disso, compreende um mecanismo que em algumas horas deixa seu personagem em pixels rapidamente, podendo assim criar diferentes paletas.
Com esse método, vários criadores vão economizar horas ao trabalhar em pixels. Como não vejo muito tutoriais disso por aí, então vamos à lição.
Primeiramente, abra o personagem no fighter factory. (Prefira a versão 3.0 de 2012)
Sim, cada versão do fighter factory possui recursos diferentes. Lembre que os programadores ao longo das versões não são os mesmos. Outra hora, falo de versões interessantes para se possuir.
Com o personagem aberto, observe qual é o primeiro slot de cores, pois esse é a paleta principal. Caso a paleta não exista, salve-a, pois vamos precisar da existência dela. Deixe o sff no formato universal e no arquivo def não se esqueça de declarar a paleta. Caso contrário, em vez da imagem ir para o primeiro slot ela vai criar outro.

Vamos para um sprite do personagem que não tenha associação com a paleta principal.

Agora vá à guia paletas e em seguida selecione editor de paletas avançado.

O seguinte quadro será mostrado ao usuário.

Aplique a paleta principal no sprite não vinculado. Logicamente após o processo você observará o personagem com cores estranhas.

Observe que após a aplicação da paleta as cores do sprite ficam desarrumadas. Dependendo do personagem a situação pode ficar pior.

Agora, vamos ao recurso que vai lhe poupar tempo. Clique no ícone adaptar a imagem para combinar com as cores da paleta. Observe que os borrões sumiram.

O método mais seguro é salvar a imagem como um arquivo e fechar a editor de paleta avançada. Às vezes da alguns problemas ao modificar a imagem automaticamente.

Agora carregue a nova imagem sobre o sprite.


Pronto! Salve o sff e repita o processo em todos os sprites que forem necessários.
Depois de pixelar todos os sprites basta você criar as paletas de seu gosto.
Isso é tudo por hora. Assim que tiver outra lição interessante, vejo vocês outra vez.
Saudações.
Orion- 5 ESTRELLAS

- Country :

Zodiaco :
Mensajes/ Messages : 1517
Fecha de inscripción/Registration date : 2015-01-29
warriorz likes this post
 Similar topics
» ayudacon estos sprites
» crear seccion sprites fx
» ayuda con adaptcion sprites
» Obtener sprites para MUGEN
» Shion de Aries (cambio de sprites y SND de Mu)
» crear seccion sprites fx
» ayuda con adaptcion sprites
» Obtener sprites para MUGEN
» Shion de Aries (cambio de sprites y SND de Mu)
Page 1 of 1
Permissions in this forum:
You cannot reply to topics in this forum
 Home
Home Portal
 Gallery
 Publications
 Search
 Register
 Log in

